
Disc brakes have become increasingly popular in India, offering superior stopping power and performance compared to traditional drum brakes. Proper adjustment of disc brakes is crucial for optimal functioning and safety. This guide will walk you through the process of adjusting disc brakes on vehicles in India, covering both mechanical and hydraulic systems.
Disc brakes consist of a rotor attached to the wheel and a caliper that houses the brake pads. When the brake is applied, the caliper squeezes the pads against the rotor, creating friction to slow or stop the vehicle. Proper adjustment ensures the pads make even contact with the rotor without rubbing when the brake is not engaged.
| Disc Brake Component | Function |
|---|---|
| Rotor | Rotating disc attached to wheel |
| Caliper | Houses brake pads and pistons |
| Brake Pads | Friction material that contacts rotor |
| Pistons | Push pads against rotor when activated |
Tools Required for Disc Brake Adjustment
Before beginning the adjustment process, gather the necessary tools. Having the right equipment on hand will make the job easier and more efficient. Here’s a list of essential tools for adjusting disc brakes in India:
- Allen wrench set: Most disc brake calipers use Allen bolts for mounting and adjustment.
- Torque wrench: Ensures proper tightening of bolts to manufacturer specifications.
- Flathead screwdriver: Useful for adjusting pad position on mechanical disc brakes.
- Brake cleaner: Removes dirt, grease, and brake dust from components.
- Clean rags: For wiping down parts and keeping the work area clean.
- Flashlight: Helps inspect brake components in tight spaces.
- Jack and jack stands: Safely elevate the vehicle for better access to brakes.
- Wheel chocks: Prevent the vehicle from rolling during maintenance.
- Brake fluid (for hydraulic systems): May be needed if bleeding the brakes.
- Bleed kit (for hydraulic systems): Includes tubing and catch container for bleeding brakes.
It’s important to note that some specialized tools may be required for certain brake systems or vehicle models. Consult your vehicle’s service manual for any specific tool requirements. Having these tools ready will help ensure a smooth adjustment process and minimize the risk of damaging brake components.
Adjusting Mechanical Disc Brakes
Mechanical disc brakes are common on entry-level and mid-range motorcycles in India. They use a cable system to actuate the brake caliper. Here’s how to adjust them:
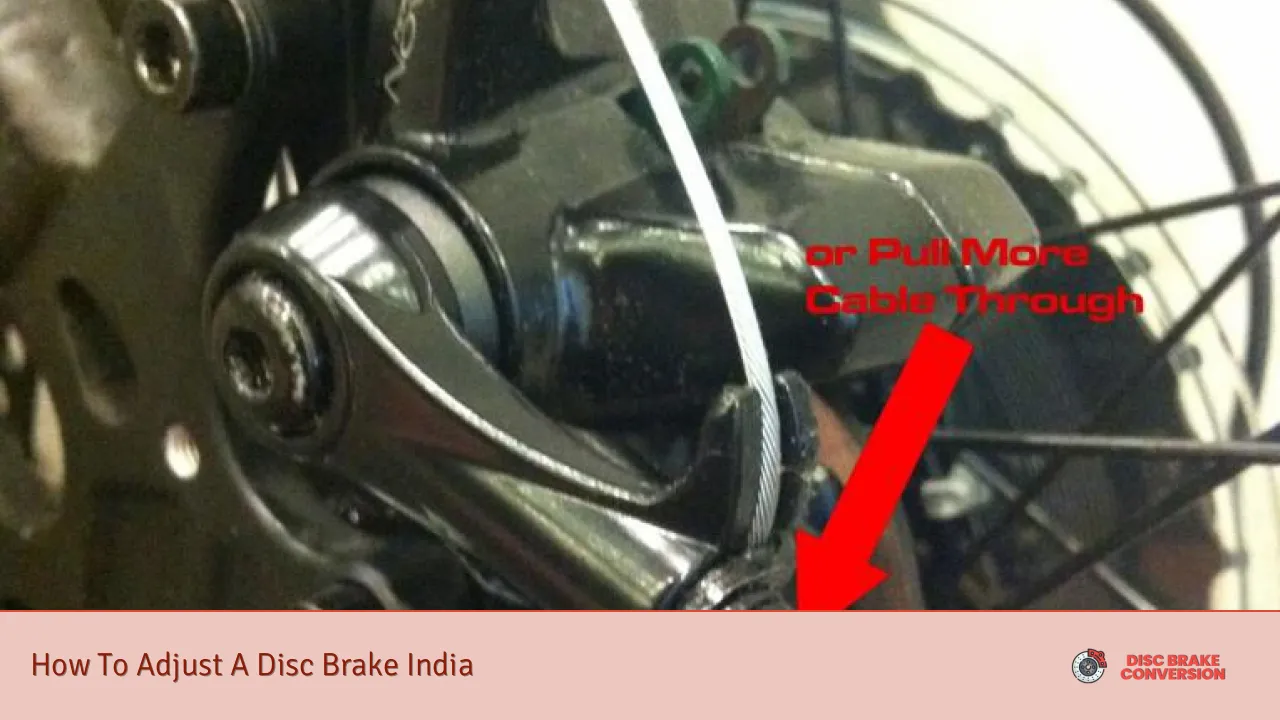
1. Locate the adjusting barrel: Find the barrel adjuster where the cable enters the caliper.
2. Check pad clearance: Spin the wheel and listen for any rubbing. There should be a small gap between the pads and rotor.
3. Loosen the lock nut: Use a wrench to loosen the lock nut on the adjusting barrel.
4. Turn the adjusting barrel: Rotate the barrel clockwise to move the pads closer to the rotor, or counterclockwise to increase clearance.
5. Test the adjustment: Spin the wheel and apply the brake. The pads should contact the rotor without excessive lever travel.
6. Fine-tune as needed: Make small adjustments until you achieve the desired lever feel and pad clearance.
7. Tighten the lock nut: Once satisfied with the adjustment, tighten the lock nut to secure the adjusting barrel in place.
8. Check both sides: Ensure both pads are equally spaced from the rotor for even braking.
Remember to check your brake adjustment regularly, especially after long rides or in wet conditions. Proper maintenance will extend the life of your brake components and ensure optimal performance.
Adjusting Hydraulic Disc Brakes
Hydraulic disc brakes are self-adjusting to some extent, but may still require occasional adjustment, particularly if the caliper becomes misaligned. Follow these steps:
1. Loosen caliper mounting bolts: Use an Allen wrench to slightly loosen the bolts that secure the caliper to the frame or fork.
2. Squeeze the brake lever: Apply the brake firmly and hold it in place. This centers the caliper over the rotor.
3. Retighten mounting bolts: While holding the brake lever, tighten the caliper mounting bolts to the specified torque.
4. Release the brake: Let go of the lever and spin the wheel to check for any rubbing.
5. Fine-tune if necessary: If rubbing persists, slightly loosen the mounting bolts and make minor adjustments to the caliper position.
6. Check pad wear: Inspect the brake pads for even wear. Uneven wear may indicate a misaligned caliper.
7. Bleed the system if needed: If the brake feels spongy, you may need to bleed the hydraulic system to remove air bubbles.
It’s crucial to use the correct type of brake fluid specified by the manufacturer when working on hydraulic systems. Mixing different types of brake fluid can cause system failure.
Common Disc Brake Issues in India
Indian road conditions and climate can present unique challenges for disc brakes. Here are some common issues and their solutions:
- Dust and dirt accumulation: Regularly clean brake components with brake cleaner to prevent buildup.
- Brake fade in hot conditions: Use high-quality brake pads designed for high temperatures.
- Corrosion in coastal areas: Apply anti-corrosion coating to metal parts and perform more frequent maintenance.
- Uneven pad wear: Ensure proper caliper alignment and consider upgrading to higher quality pads.
- Warped rotors: Have rotors machined or replaced if you feel pulsation in the brake lever.
Addressing these issues promptly will help maintain the effectiveness of your disc brakes and ensure your safety on Indian roads.
Maintenance Tips for Disc Brakes in India
To keep your disc brakes in top condition, follow these maintenance tips:
- Inspect regularly: Check brake pads, rotors, and calipers for wear or damage at least monthly.
- Keep components clean: Use brake cleaner to remove dirt and brake dust after rides in dusty conditions.
- Replace pads on time: Don’t wait until pads are completely worn out. Replace them when they reach the minimum thickness specified by the manufacturer.
- Use quality brake fluid: For hydraulic systems, use the recommended brake fluid and change it according to the service schedule.
- Protect from water: After riding in heavy rain, apply the brakes gently to help dry the components.
- Address squealing promptly: If your brakes start squealing, it may indicate contaminated pads or glazed rotors. Clean or replace as necessary.
- Avoid touching rotors: The oils from your skin can contaminate the rotor surface. If you must handle the rotor, use a clean, lint-free cloth.
By following these tips, you can ensure your disc brakes remain effective and reliable, even in challenging Indian conditions.
FAQs About How To Adjust A Disc Brake India
- How often should I adjust my disc brakes in India?
Check and adjust if necessary every 1000-1500 km or if you notice changes in brake performance. - Can I adjust disc brakes at home without special tools?
Basic adjustments can be made at home, but a torque wrench is recommended for proper tightening. - What causes disc brakes to squeal in Indian conditions?
Squealing can be caused by dust, contaminated pads, or glazed rotors. Clean components and replace pads if necessary. - Is it normal for new disc brakes to require frequent adjustment?
New brakes may need a few adjustments as they bed in, but should stabilize after 200-300 km of use. - How do I know if my disc brake rotors need replacement?
Replace rotors if they are warped, have deep grooves, or are below the minimum thickness specified by the manufacturer.